If you’ve been dreaming of a kitchen cabinet makeover but dreading the hefty price tag and weeks of disruption, there’s a smarter solution that’s transforming kitchens across America. Grey shaker cabinets with glass doors have become the go-to choice for homeowners who want that designer look without the designer expense—and when you choose ready to assemble cabinets, you’re not just saving money, you’re gaining complete control over your timeline and installation process. The beauty of an RTA cabinet upgrade lies in its accessibility: these aren’t the flimsy flat-packs of yesterday, but precision-engineered components that deliver showroom quality at a fraction of the cost. Glass door cabinets create an instant sense of depth and sophistication in your kitchen, breaking up the visual weight of solid doors while showcasing your favorite dishes or glassware. Whether you’re a seasoned DIYer or tackling your first major home improvement project, this comprehensive tutorial will walk you through every stage of transforming your upper cabinets with grey shaker glass-door units from 10 Percent Cabinetry—from measuring and ordering to the final installation that will have your guests asking for your contractor’s number.
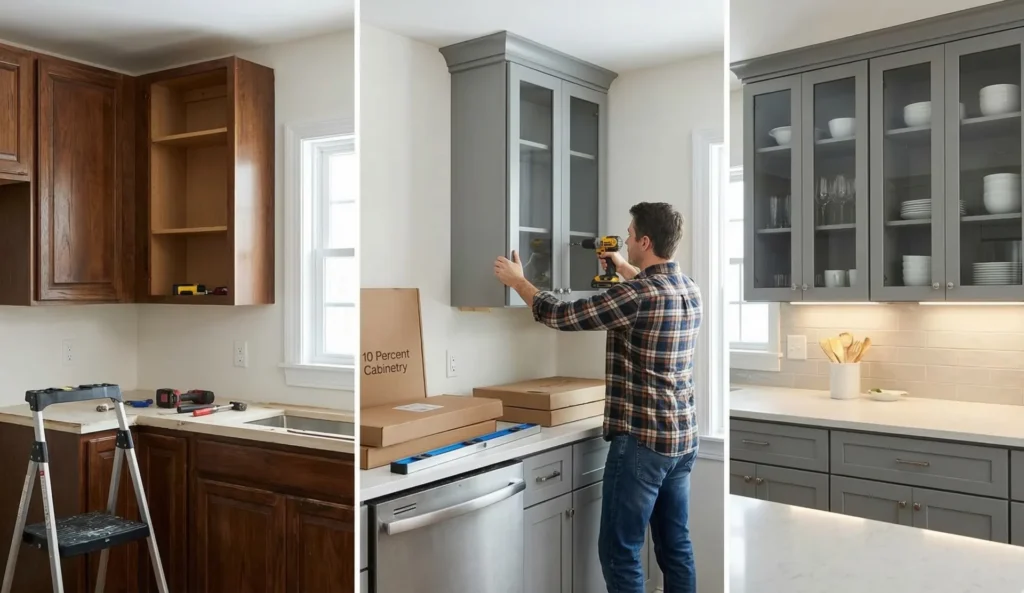
Table of Contents
Why Choose a Grey Shaker RTA Glass-Door Upgrade for Your Kitchen
When homeowners dream of transforming their kitchens without breaking the bank, the combination of grey shaker cabinets with glass door inserts stands out as one of the most compelling design choices available today. This upgrade strikes the perfect balance between timeless elegance and contemporary appeal, creating a kitchen that feels both welcoming and sophisticated. What makes this approach even more attractive is the use of ready to assemble cabinets, which deliver premium aesthetics at a fraction of the cost of custom cabinetry.
The beauty of an RTA cabinet solution lies not just in the significant cost savings—typically 30-50% less than custom alternatives—but in the surprising ease of installation and the professional-grade results they deliver. For upper cabinets especially, where visual impact matters most and structural demands are somewhat lighter than base units, RTA options provide an ideal entry point for homeowners looking to make a dramatic change without the commitment of a full kitchen renovation.
The Enduring Appeal of Grey Shaker Style
Grey has emerged as the neutral of choice in modern kitchen design, replacing the dominance of white and cream tones that characterized previous decades. Unlike stark white, which can feel clinical, or beige, which can appear dated, grey offers warmth and depth while remaining remarkably versatile. When paired with the clean lines and recessed panel design of shaker-style cabinetry, grey creates a sophisticated foundation that complements virtually any design aesthetic—from farmhouse charm to minimalist modern.
The shaker profile itself represents one of the most enduring cabinet styles in American home design. Its simple five-piece door construction, featuring a recessed center panel surrounded by a square frame, originated with 18th-century Shaker craftsmen who valued utility and honest construction. Today, this design continues to resonate because it avoids the ornate details that quickly date a kitchen, instead offering clean geometry that works equally well in traditional and contemporary settings.
Glass Doors: Function Meets Visual Drama
Incorporating glass door cabinets into your upper cabinet design transforms both the functionality and atmosphere of your kitchen. Glass inserts break up the visual weight of solid cabinetry, making the space feel more open and less confined—particularly valuable in kitchens with limited square footage or lower ceilings. This sense of airiness is precisely what many homeowners seek when they embark on a kitchen cabinet makeover, especially when they’re not ready to commit to removing cabinets entirely or undertaking structural changes.
According to the National Kitchen and Bath Association, kitchens featuring glass-front cabinetry can see a return on investment of up to 80% at resale, significantly higher than many other cabinet upgrades, while also increasing the perceived value of the entire home.
Beyond aesthetics, glass doors serve practical purposes. They allow you to quickly locate items without opening every cabinet, reducing wear on hinges and keeping cabinet interiors cooler by allowing heat to dissipate. They also create natural display opportunities for attractive dishware, glassware, or collectibles, adding personality and visual interest at eye level where impact is greatest.
The RTA Advantage: Quality Without the Premium Price Tag
The ready-to-assemble cabinet market has evolved dramatically over the past decade. Today’s RTA offerings rival custom cabinets in materials, construction quality, and finish durability, but they maintain their cost advantage through efficient manufacturing and direct-to-consumer shipping models. For homeowners willing to invest a weekend in assembly and installation, the savings can fund other aspects of the renovation—new countertops, upgraded appliances, or professional backsplash installation.
Modern RTA cabinets arrive with pre-drilled holes, cam-lock assembly systems, and comprehensive instructions that make assembly straightforward even for those with limited carpentry experience. The key advantages include:
- Immediate availability: RTA cabinets ship within days rather than the 8-12 week lead times typical of custom cabinetry, allowing you to complete your project on your timeline
- Lower shipping costs: Flat-pack design dramatically reduces freight expenses compared to fully assembled units
- Quality control: Factory assembly by automated systems often results in more consistent quality than field-assembled custom cabinets
- Easy replacement: If a door or panel becomes damaged years later, replacement components are readily available and affordable
- Eco-friendly option: Efficient packaging reduces shipping volume and associated carbon emissions by up to 60% compared to assembled alternatives
- DIY satisfaction: The sense of accomplishment from installing your own cabinetry adds intangible value to your home
ROI and Long-Term Value Considerations
Kitchen renovations consistently rank among the top home improvements for return on investment, and cabinet upgrades typically lead those returns. The combination of grey shaker styling with glass inserts represents a sweet spot in the market—distinctive enough to make a real impact, yet classic enough to appeal to broad buyer preferences should you eventually sell.
The neutral grey palette ensures your kitchen won’t feel dated in five years, while the shaker profile’s proven longevity means it’s unlikely to fall out of favor. Glass inserts add that touch of sophistication that elevates the space beyond basic builder-grade cabinetry. When executed with quality RTA products, this upgrade delivers the visual impact of a $20,000 cabinet replacement for a fraction of the investment.
With these compelling advantages in mind, understanding the practical steps to select, assemble, and install your grey shaker glass-door cabinets becomes the next essential phase of your transformation journey.
Planning Your Grey Shaker Cabinet Transformation: Measurements and Materials
The foundation of any successful kitchen cabinet makeover lies in meticulous planning and precise measurements. Before you order a single RTA cabinet or start dismantling your existing setup, you’ll need to create a comprehensive blueprint that accounts for every inch of your space and every component you’ll need. This upfront investment of time will save you from costly mistakes and frustrating delays once your project is underway.
Measuring Your Upper Cabinet Space with Precision
Accurate measurements form the cornerstone of your transformation. Start by removing everything from your upper cabinets and clearing the countertops below to give yourself unobstructed access. Using a quality laser measure or steel tape measure, record the width, height, and depth of each cabinet section. Don’t assume symmetry—older kitchens especially can have variations you won’t notice until you measure carefully.
Pay particular attention to these critical dimensions: the distance from your countertop to the bottom of the existing cabinets (standard is 18 inches, but verify yours), the space between cabinet tops and your ceiling, and any obstacles like ductwork, electrical boxes, or windows that might affect installation. Measure at multiple points along each dimension, as walls and ceilings are rarely perfectly level or plumb. Document whether you have soffits above your cabinets or if they extend to the ceiling, as this affects which ready to assemble cabinets styles will work best.
Selecting the Right Grey Shaker RTA Cabinet Features
Once your measurements are confirmed, you can specify exactly which grey shaker cabinets will suit your space. For glass door cabinets, you’ll need to decide between full glass doors, which showcase your entire cabinet interior, or partial glass with mullion patterns that add visual interest while concealing some contents. Consider whether you want clear, frosted, or seeded glass—each creates a distinctly different aesthetic.
According to the National Kitchen & Bath Association, homeowners who invest in proper planning and quality RTA materials see satisfaction rates exceeding 87%, compared to just 62% for those who rush the specification process.
Cabinet construction quality varies significantly across manufacturers. Look for these premium features: 3/4-inch plywood box construction rather than particle board, solid wood doors and face frames, soft-close hinges and drawer glides, dovetail drawer boxes, and adjustable shelving. Grey shaker cabinets typically come in several undertones—from warm greige to cool charcoal—so order samples before committing to ensure the color complements your existing finishes, backsplash, and countertops.
Creating Your Comprehensive Materials List
Beyond the cabinets themselves, a complete transformation requires numerous supporting materials. Your detailed shopping list should include:
- Cabinet hardware: Pulls and knobs in brushed nickel, matte black, or brass finishes (budget $3-15 per piece; plan on 12-20 pieces for typical upper cabinet runs)
- Installation supplies: Cabinet screws (2.5″ and 3″), wall anchors, shims, wood glue, and touch-up markers matching your grey finish
- Lighting components: Under-cabinet LED strip lights or puck lights to illuminate countertops and showcase glass-front cabinet contents ($80-200 for quality systems)
- Organizational inserts: Shelf risers, plate racks, or stemware holders to maximize your newly upgraded space
- Tools and safety equipment: Stud finder, level (4-foot and torpedo), drill with bits, circular saw or miter saw, safety glasses, and work gloves
- Finishing materials: Caulk, wood filler, primer, and paint for any exposed walls or patching needed after removal of old cabinets
Budget Considerations and Recommended Brands
For a standard 12-foot run of upper cabinets, expect to invest between $1,200 and $3,500 depending on quality tier and features. Budget-conscious options from manufacturers like Hampton Bay (available through major retailers) start around $100 per linear foot, while premium brands such as Forevermark, CNC Cabinetry, or Lily Ann Cabinets range from $150-250 per linear foot for their grey shaker lines with glass door options.
Remember that kitchen cabinet makeover costs extend beyond the boxes themselves. Factor in approximately 20-30% additional for hardware, installation supplies, and contingencies for unexpected issues like wall repairs or electrical work. Many homeowners find that allocating $200-400 for unforeseen expenses provides comfortable cushion without breaking the budget.
With your measurements recorded, cabinet specifications determined, and materials list finalized, you’re ready to move forward with actually ordering your components and preparing your kitchen for the transformation ahead.
Preparing Your Kitchen Space for New Upper Cabinets
Before you dive into installing your new grey shaker cabinets with glass doors, proper preparation is essential for a smooth installation process. Taking the time to safely remove existing cabinets, assess your wall conditions, and protect your kitchen surfaces will prevent costly mistakes and ensure your RTA cabinet installation goes according to plan. This preparation phase typically takes 4-6 hours but sets the foundation for professional-looking results that will last for decades.
Safe Removal of Existing Upper Cabinets
Removing old cabinets requires patience and the right approach to avoid damaging your walls or injuring yourself. Start by turning off power to any outlets or lighting fixtures within the cabinets at your electrical panel. Remove all contents from the cabinets and take down the doors by unscrewing the hinges—this reduces weight and makes handling safer. Next, locate the screws that secure the cabinet boxes to the wall studs, typically found inside the cabinet along the top rail and hanging strips.
Have a helper support the cabinet weight while you remove the screws, working from one end to the other. Cabinets are often heavier than they appear, especially older solid wood units, so never attempt to remove upper cabinets alone. As you detach each cabinet, carefully lower it down rather than pulling it forward, which could tear drywall or damage backsplash tiles. If cabinets are connected to each other with screws through the face frames, remove these connections first before attempting to remove individual units from the wall.
Wall Inspection and Repairs
Once your old cabinets are removed, you’ll likely discover imperfections in your walls that need attention before installing your new ready to assemble cabinets. This is the perfect opportunity to address issues that would compromise your installation quality. Use a stud finder to locate and mark all vertical studs in your cabinet installation area—your new glass door cabinets must be secured to these studs, not just drywall, to safely support the weight.
According to professional cabinet installers, approximately 70% of kitchen cabinet installation problems stem from inadequate wall preparation, including undetected damage, improper stud location, or failure to achieve a level mounting surface.
Inspect your walls carefully for these common issues:
- Holes and damage from old cabinet screws: Fill these with spackling compound or joint compound, let dry completely, then sand smooth for a flush surface
- Uneven wall surfaces: Use a long level to check for high and low spots that could prevent cabinets from hanging flush against the wall
- Water damage or soft spots: Address any moisture issues immediately, as wet or damaged drywall cannot safely support cabinet weight
- Paint or wallpaper damage: Repair and repaint the wall area where your new cabinets will hang for a clean, finished appearance
- Missing or damaged studs: If studs are compromised, consult a contractor about adding blocking or reinforcement before proceeding
- Electrical outlet positioning: Verify that existing outlets will align properly with your new cabinet layout or plan necessary adjustments
For walls that aren’t perfectly plumb, you may need to use shims during installation to ensure your grey shaker cabinets hang level and straight. Take precise measurements from ceiling to countertop at multiple points along your wall to identify any variations that exceed 1/4 inch, which will require shimming.
Protecting Your Kitchen During Installation
A kitchen cabinet makeover generates dust, requires tools, and involves maneuvering large cabinet boxes through your space. Comprehensive protection of your floors, countertops, and appliances prevents damage and makes cleanup significantly easier. Start by removing small appliances, decorative items, and anything breakable from countertops and lower cabinets.
Cover your countertops with thick moving blankets or cardboard, securing the edges with painter’s tape to prevent shifting. Protect your flooring with rosin paper or heavy-duty drop cloths, taping seams to create a continuous protective layer. If you have hardwood or tile floors, add an extra layer of cardboard in high-traffic areas where you’ll be standing on ladders or moving cabinets. For island countertops that might serve as a temporary workspace, double up on protection layers.
Create a dedicated staging area where you can unbox and organize your RTA cabinet components without cluttering your workspace. Many installers use a nearby dining room or garage for this purpose. Clearly label all cabinet pieces as you unpack them according to your layout plan, and group hardware and accessories together in labeled containers. This organization prevents confusion during assembly and ensures you have all necessary components before starting installation.
With your space properly prepared, walls inspected and repaired, and protective measures in place, you’re now ready to begin the exciting process of assembling and installing your new glass door cabinets.
Step-by-Step: Assembling Your Grey Shaker RTA Cabinets with Glass Inserts
Assembling ready to assemble cabinets might seem daunting at first, but with proper preparation and a systematic approach, you’ll find the process surprisingly straightforward. Grey shaker cabinets arrive flat-packed with all necessary hardware, and most homeowners complete assembly in 30-45 minutes per cabinet once they’ve mastered the technique. This section walks you through every stage of the build process, from initial unboxing through final hardware installation.
Unboxing and Pre-Assembly Preparation
Before you begin assembly, create a clean, spacious workspace where you can lay out all components without risk of damage. Open your RTA cabinet box carefully and verify that all pieces match the included inventory list. Quality manufacturers include detailed diagrams and hardware packets clearly labeled for each assembly stage. Lay out the cabinet panels, shelves, and back panel in the order you’ll need them, and separate all screws, cam locks, and dowels by type. This organizational step saves considerable time and prevents mid-assembly confusion when you’re searching for a specific fastener.
Inspect the grey finish on all panels for any shipping damage before you start. Most reputable suppliers replace damaged components quickly, but it’s far easier to identify issues before assembly begins. Check that pre-drilled holes align properly and that all edges are smooth and free from splinters. If you notice the distinctive clean lines and recessed panel design that define shaker-style cabinetry, you’re working with authentic craftsmanship that will deliver professional results.
Core Cabinet Box Assembly
The foundation of your kitchen cabinet makeover starts with building a solid box structure. Modern RTA cabinet systems typically use cam-lock fasteners that create incredibly strong joints without requiring specialized tools. Begin by attaching the bottom panel to one side panel, inserting wooden dowels into their corresponding holes for alignment, then securing with cam locks by turning them 180 degrees with a standard screwdriver. The cam-lock system is engineered for strength—properly assembled, these joints rival traditional mortise-and-tenon joinery.
Follow these essential assembly steps for a professional outcome:
- Insert all dowels into their holes before connecting any panels, ensuring smooth alignment without forcing pieces together
- Tighten cam locks firmly but avoid over-tightening, which can strip the engineered wood or cause the lock to fail
- Attach the back panel only after the four-sided box is completely assembled—this squares the cabinet and adds structural rigidity
- Use wood glue sparingly on dowel joints if you want permanent assembly, though cam locks alone provide adequate strength for most applications
- Check that the cabinet sits perfectly square by measuring diagonal corners—they should be identical within 1/8 inch
- Allow any glue to cure for at least two hours before handling the cabinet or installing doors
Professional cabinet installers note that 90% of assembly issues stem from rushing the alignment process. Taking an extra two minutes to verify that dowels are fully seated and panels are square prevents hours of frustration during door installation and mounting.
Installing Glass Door Panels and Hardware
Once your grey shaker cabinets boxes are assembled, attention turns to the distinctive glass door cabinets that will showcase your dishware or decorative items. Glass inserts typically arrive pre-installed in the door frames or packaged separately with rubber gaskets for protection. If you’re installing glass yourself, work on a padded surface and handle the panels by their edges to avoid fingerprints and potential breakage. Most shaker-style doors accommodate glass with a thin retaining strip or clips that secure the panel within the recessed frame opening.
Hinge installation requires precision for doors that open smoothly and align perfectly. European-style cup hinges are standard on ready to assemble cabinets and offer excellent adjustability. Position hinges in their pre-drilled cups on the door’s interior side, then attach the mounting plates to the cabinet interior using the provided screws. Before tightening completely, hang the door and test its swing—you’ll make fine adjustments after all doors are initially mounted. Most hinges provide three-axis adjustment: in-and-out depth, left-right alignment, and up-down positioning. This adjustability ensures that even if your cabinet installation isn’t perfectly level, your doors will close flush and operate beautifully.
Final Hardware and Quality Checks
The finishing touches transform assembled components into polished, functional cabinetry. Install handles or knobs according to your design preference, typically centered on shaker-style doors or positioned at the upper corner for a contemporary look. Use a template or measuring jig to ensure consistent placement across all cabinets—uneven hardware is immediately noticeable and undermines an otherwise professional installation. Soft-close adapters can be added to standard hinges if your cabinets didn’t include this feature, dramatically improving the user experience and protecting both glass panels and cabinet frames from impact damage.
Before proceeding to wall installation, open and close each door multiple times, checking for smooth operation and proper alignment. Adjust hinges as needed so doors sit flush with cabinet faces and reveal consistent gaps between adjacent doors. This attention to detail during assembly sets the foundation for a flawless kitchen transformation that will impress for years to come. With your cabinets fully assembled and hardware installed, you’re now ready to plan the actual mounting process that will secure these beautiful units to your kitchen walls.
How to Properly Mount and Level Your New RTA Cabinets
Installing grey shaker cabinets with glass doors isn’t just about aesthetics—it’s about precision. Even the most beautiful ready to assemble cabinets will look unfinished if they’re crooked, sagging, or poorly secured. The difference between a professional-looking kitchen cabinet makeover and an amateur attempt comes down to proper mounting and leveling techniques. This phase requires patience, the right tools, and a methodical approach that ensures your cabinets will function flawlessly for decades.
Finding and Marking Wall Studs with Precision
Before your RTA cabinet touches the wall, you need to know exactly where your structural support is located. Wall studs—typically spaced 16 or 24 inches apart in American homes—are your cabinet’s lifeline. Start by using an electronic stud finder along the wall where your cabinets will hang, marking each stud location with painter’s tape rather than pencil marks that might show later. For added verification, drive a small finishing nail through the drywall in an area that will be hidden by the cabinet to confirm you’ve hit solid wood.
In older homes or homes with plaster walls, studs may not follow standard spacing. If you encounter irregular stud placement, map out the entire installation area before proceeding. Draw a level horizontal line at your desired cabinet height, then mark vertical lines at each stud location. This reference grid becomes your roadmap for the entire installation, ensuring you know exactly where to drive screws when your glass door cabinets are in position.
Achieving Perfect Level Alignment
A laser level is worth its weight in gold during cabinet installation. Set up your laser to project a perfectly horizontal line at the height where your cabinet bottoms will sit. If you’re working without a laser level, use a 4-foot or 6-foot builder’s level and draw a reference line using a long straightedge. Remember that floors are rarely level, so never use your floor as a reference point for cabinet height.
Start with your corner cabinet or the cabinet at one end of your run. Using shims behind the mounting rail, adjust the cabinet until it sits perfectly level both front-to-back and side-to-side. Check your level in multiple directions before driving any permanent screws. Once your first cabinet is secure and level, it becomes the reference point for all adjacent cabinets. Work methodically from one end to the other, checking level frequently and making micro-adjustments with shims as needed.
Professional cabinet installers know that a difference of just 1/8 inch over an 8-foot run becomes visually obvious and can cause doors to swing open or closed on their own. Take the time to get it right the first time.
Securing Cabinets Safely to Wall Structure
Your grey shaker cabinets deserve better than drywall anchors. Every cabinet must be secured directly into wall studs using appropriate fasteners. For most installations, 2.5-inch cabinet screws work perfectly, penetrating through the cabinet back, through the drywall, and at least 1.5 inches into the stud. Drive screws through the solid mounting rails at the top and bottom of your cabinet back—never through thin panels that might split or pull through under load.
Follow this secure mounting checklist for each cabinet:
- Drive at least four screws per cabinet—two at the top mounting rail and two at the bottom
- Use additional screws for cabinets wider than 24 inches or those that will hold heavy items
- Tighten screws gradually, alternating between top and bottom to maintain level
- Check for any gaps between the cabinet back and wall, adding shims if necessary before final tightening
- Connect adjacent cabinets together with 1.25-inch screws through the front frame before securing to the wall
- Verify that all cabinets remain level after tightening, making adjustments before moving to the next unit
Adjusting Door Operation for Smooth Function
Once your ready to assemble cabinets are mounted securely, turn your attention to the glass doors themselves. European-style hinges common on RTA cabinet systems offer three-axis adjustment: in-and-out, up-and-down, and side-to-side. Start by checking that all doors hang at the same height relative to the cabinet openings. If a door sits too high or low, loosen the mounting screws on the hinge plates and shift the door vertically until it aligns properly with adjacent doors.
Next, check the reveal—the gap between the door edge and the cabinet frame. This gap should be consistent all the way around, typically 1/8 inch. Adjust the depth by turning the screw on the hinge arm closest to the cabinet side. For side-to-side alignment, loosen the hinge mounting screws and slide the entire hinge plate along its mounting slots. Glass doors are particularly unforgiving of misalignment because you can see through them, making any irregularities immediately obvious.
Test each door’s closing action by opening and releasing it from about 30 degrees. The door should close smoothly and pull itself shut with the soft-close mechanism engaging gently. If doors slam shut or require pushing to close completely, adjust the tension on the soft-close dampeners using a Phillips screwdriver. With your cabinets now mounted, level, and perfectly adjusted, you’re ready to tackle the final finishing touches that will complete your transformation.
Finishing Touches and Maintenance Tips for Long-Lasting Results
Your grey shaker cabinets with glass doors are installed and looking stunning, but a few strategic finishing touches will elevate the project from good to exceptional. These final details protect your investment and ensure your RTA cabinet upgrade maintains its showroom appearance for years to come.
Sealing Gaps with Professional Caulking Techniques
Even perfectly installed cabinets develop small gaps where they meet walls, ceilings, or each other. Professional-grade paintable caulk in a color matching your wall or cabinet finish creates seamless transitions. Run a thin bead along the top edge where cabinets meet the ceiling, smoothing it with a dampened finger or caulk tool within five minutes of application. This prevents dust accumulation and gives your kitchen cabinet makeover a custom, built-in appearance. For gaps between cabinet boxes, use caulk sparingly—too much creates unsightly bulges that detract from the clean lines of shaker-style cabinetry.
Illuminating Your Glass Door Cabinets with LED Upgrades
Few additions transform the ambiance of glass door cabinets quite like thoughtfully positioned LED lighting. Puck lights or LED strips installed inside the cabinet boxes create a gallery-like display for your dishware while providing functional task lighting. Warm white LEDs (2700-3000K) complement the warm undertones in many grey shaker finishes, while cool white options suit contemporary kitchens. Battery-operated solutions offer flexibility for ready to assemble cabinets without existing electrical connections, though hardwired options provide more consistent illumination without battery changes.
According to the National Kitchen & Bath Association, under-cabinet and interior cabinet lighting increases both the perceived value and functionality of a kitchen, with 76% of designers considering it an essential element in modern kitchen design.
Consider motion-sensor LED strips that activate when you open cabinet doors—this feature adds convenience without the need for additional switches. Position lights toward the front of the cabinet to minimize shadows and showcase the contents behind your glass panels without creating harsh glare.
Essential Cleaning and Care for Glass, Finish, and Hardware
Maintaining the pristine appearance of your grey shaker cabinets requires understanding the specific needs of each component. Glass doors benefit from regular cleaning with a vinegar-water solution (one part vinegar to four parts water) or commercial glass cleaner applied with a microfiber cloth. Always spray the cloth rather than the glass directly to prevent solution from seeping into door frames or behind glass panels.
For the shaker cabinet surfaces themselves, gentle is better. Follow these care guidelines to preserve your finish:
- Wipe grey cabinet surfaces weekly with a slightly damp microfiber cloth, then immediately dry with a clean towel to prevent water spots
- Use pH-neutral cleaners specifically formulated for painted or laminated cabinetry—avoid abrasive cleaners or scouring pads that scratch finishes
- Address spills and splatters immediately, as acidic substances like tomato sauce or citrus can damage protective coatings over time
- Apply furniture polish or cabinet conditioning products every 3-4 months to maintain the subtle sheen of painted finishes
- Keep cabinet surfaces away from direct heat sources, as excessive heat can cause paint to yellow or bubble
Hardware deserves attention too. Wipe knobs, pulls, and hinges with a soft cloth when cleaning cabinet faces. If you’ve chosen brass or copper finishes, use metal-specific polish quarterly to prevent tarnishing. Stainless steel hardware maintains its luster with simple soap-and-water cleaning followed by thorough drying.
Long-Term Maintenance for Structural Integrity
The longevity of your glass door cabinets depends on periodic inspections and minor adjustments. Check hinge screws every six months—the weight of glass doors can gradually loosen connections, causing doors to sag or misalign. Tighten any loose screws with appropriate screwdrivers, taking care not to overtighten and strip the particle board or plywood core.
Examine the silicone or rubber bumpers on door corners and cabinet frames annually. These small components prevent glass-on-wood contact and reduce noise when closing doors. Replace worn bumpers promptly to protect your glass panels from chips or cracks. Most hardware stores stock universal cabinet bumpers that adhere with peel-and-stick backing.
For cabinets installed near sinks or dishwashers, monitor for moisture exposure. Even quality RTA cabinets can develop issues if water repeatedly contacts unfinished interiors. Consider applying clear polyurethane to any exposed particle board or wood inside sink base cabinets as an extra moisture barrier.
With proper care and these thoughtful finishing touches, your grey shaker glass-door upgrade will continue impressing guests and serving your household efficiently for decades. Now that your cabinets are complete and protected, let’s explore how this transformation impacts your home’s overall value and appeal.
Common RTA Cabinet Installation Mistakes and How to Avoid Them
Even experienced DIYers can stumble when installing ready to assemble cabinets, and those missteps often become costly in terms of both time and materials. Grey shaker cabinets with glass door inserts present unique challenges that go beyond standard cabinet installation—the delicate glass panels, precise alignment requirements, and visual prominence of upper cabinets mean errors are immediately visible. Understanding these common pitfalls before you begin can save you from frustration and ensure your kitchen cabinet makeover delivers professional results.
Measurement Errors: The Foundation of Installation Failure
The single most frequent mistake in RTA cabinet installations stems from inaccurate measurements or failing to account for real-world wall conditions. Unlike the perfect dimensions shown in planning software, actual kitchens feature walls that bow, ceilings that slope, and corners that aren’t quite square. When working with glass door cabinets, these discrepancies become glaringly obvious since the transparent panels create sight lines that expose any misalignment.
Before ordering your cabinets from 10 Percent Cabinetry, measure your space at multiple points along each wall—top, middle, and bottom. Record the smallest measurement as your working dimension, since you’ll need to accommodate the tightest space. For upper cabinet installations, pay particular attention to the distance between your countertop and ceiling, accounting for crown molding if you plan to add it. Many homeowners discover too late that their “standard” ceiling height actually varies by an inch or more across the kitchen span.
Glass Handling and Door Installation Mishaps
Glass door cabinets transform grey shaker cabinets from practical storage into focal points, but the glass components demand careful handling throughout the installation process. The most common errors include fingerprints embedded in silicone adhesive, stress cracks from over-tightened hardware, and misaligned glazing that creates visible gaps.
Professional cabinet installers report that nearly 40% of glass door damage occurs during the final assembly stage, when installers rush to complete the project and apply excessive force to hardware or fail to adequately support the door weight during hinge attachment.
Always wear cotton gloves when handling glass panels, and clean them thoroughly before final installation—not after. Once the retaining strips or glazing beads are in place, removing smudges becomes significantly more difficult. Support the full weight of each door when attaching hinges rather than allowing the door to hang from partially-secured hardware. For larger glass panels, use a helper to hold the door in position while you work.
Wall Preparation and Leveling Oversights
Skipping proper wall preparation ranks among the most regrettable shortcuts in ready to assemble cabinets installation. Unlike lower cabinets that rest on the floor and gain stability from countertop weight, upper cabinets depend entirely on secure wall mounting. Drywall alone won’t support the combined weight of cabinets, dishes, and glassware—you need solid anchoring into wall studs or robust blocking.
Begin by locating all studs in your installation area with a quality stud finder, marking their positions clearly above your planned cabinet height where marks will be hidden. If studs don’t align with your cabinet layout, install a horizontal ledger board into the studs to create a secure mounting surface. This becomes especially critical with a kitchen cabinet makeover featuring glass doors, since the visual weight of transparent panels makes any sagging or misalignment immediately apparent.
Critical Installation Mistakes to Prevent
Beyond the major categories of errors, several specific mistakes repeatedly derail RTA cabinet projects:
- Installing cabinets before assembling them completely: Attempting to finish assembly while cabinets hang on the wall leads to stress on joints, difficult access to fasteners, and increased risk of dropping expensive glass components
- Neglecting to install a temporary ledger board: This simple support rail allows you to rest cabinets while securing them, preventing fatigue-related mistakes and ensuring proper alignment across multiple units
- Over-tightening adjustment screws: European-style hinges found on quality grey shaker cabinets require delicate adjustment—forcing screws damages the adjustment mechanism and strips mounting holes
- Failing to shim gaps between cabinets and walls: Attempting to force cabinets flush against uneven walls stresses the cabinet structure and prevents doors from operating smoothly
- Installing cabinets out of sequence: Always work from the highest point in your kitchen downward and from corners outward to maintain level lines and proper alignment
- Ignoring manufacturers assembly instructions: RTA cabinet designs vary by manufacturer, and hardware placement differs—what worked for your last project may not apply to your current cabinets
Many first-time installers also underestimate the importance of having a capable assistant throughout the process. Upper cabinet installation inherently requires at least two people for safe, accurate positioning, and this becomes doubly true with glass door cabinets that combine weight with fragility.
With these common pitfalls identified and prevention strategies in place, you’re prepared to tackle your installation with confidence—but even perfect installation won’t matter if you neglect the critical adjustments and fine-tuning that transform good cabinet work into exceptional results.
Complete Your Kitchen Transformation with 10 Percent Cabinetry
You’ve just walked through the complete process of transforming your upper cabinets with a grey shaker RTA glass-door upgrade, and the results speak for themselves. This isn’t just a cabinet replacement—it’s a comprehensive kitchen cabinet makeover that elevates your entire cooking space from dated and closed-off to bright, sophisticated, and undeniably modern. The marriage of grey shaker cabinets with elegant glass door cabinets creates a visual impact that goes far beyond the sum of its parts, turning what was once a purely functional kitchen into a space you’ll actually want to spend time in.
The beauty of working with ready to assemble cabinets from 10 Percent Cabinetry lies not just in the final result, but in the journey itself. You’ve proven that professional-looking results don’t require professional installation costs, and that with the right guidance and quality materials, even complex upgrades like glass door installation are well within reach of the dedicated homeowner. Your transformed kitchen now features the clean lines and timeless appeal that only authentic shaker-style cabinetry can deliver, enhanced by the sophistication of glass fronts that invite light and interest into your space.
Capturing and Sharing Your Transformation
Before you dive into enjoying your newly transformed kitchen, take a moment to document your success. Comparing before-and-after photos isn’t just satisfying—it’s genuinely inspiring for others considering their own kitchen upgrades. Natural lighting works best for these photos, so shoot during daytime hours when your new glass-front cabinets can truly shine. Capture angles that showcase both the overall room transformation and detailed close-ups of the grey shaker cabinet details and glass door hardware. These images tell the story of what’s possible with an RTA cabinet project, demonstrating that high-end results don’t require high-end budgets.
Measuring Your Investment Return
Kitchen renovations consistently rank among the highest-return home improvements, and your glass door cabinet upgrade is no exception. While a full kitchen remodel might recoup 60-80% of its cost at resale, strategic upgrades like yours often deliver disproportionate value. The visual impact of grey shaker cabinets with glass fronts creates an impression of quality throughout the entire kitchen, even if you haven’t touched every surface.
Industry research shows that cabinet upgrades account for nearly 40% of total kitchen renovation budgets, yet they’re responsible for approximately 70% of the visual transformation—making them the single most impactful investment you can make in your kitchen’s appearance.
Beyond resale value, consider the daily quality-of-life improvements you’ve created. Your kitchen now feels larger thanks to the light-reflecting properties of glass cabinets. The refined aesthetic of shaker-style cabinetry brings a sense of calm and order. And perhaps most importantly, you’ve created a space that better reflects your personal style and makes cooking and entertaining genuinely more enjoyable.
Your Kitchen Cabinet Makeover Checklist
To help you maintain the quality and appearance of your newly upgraded cabinets, keep these essential practices in mind:
- Monthly glass cleaning: Use a streak-free glass cleaner and microfiber cloth to keep your cabinet fronts crystal-clear and showcase your displayed items at their best
- Hardware inspection: Check all hinges and handles quarterly to ensure they remain tight and properly aligned, preventing premature wear
- Interior organization: Rotate displayed items seasonally to keep your glass-front cabinets looking fresh and prevent dust accumulation on permanently positioned pieces
- Cabinet exterior care: Wipe down the grey shaker cabinet frames with a damp cloth and mild soap every few weeks to maintain their factory-fresh appearance
- Moisture monitoring: Keep an eye on condensation around sink areas and ensure proper ventilation to protect your investment from water damage
- Touch-up maintenance: Address minor scuffs or scratches immediately with appropriate touch-up products to prevent small issues from becoming visible problems
Next Steps and Continued Inspiration
Your upper cabinet transformation is complete, but your relationship with quality cabinetry doesn’t have to end here. Whether you’re considering extending your grey shaker aesthetic to lower cabinets, planning a bathroom vanity upgrade, or simply exploring options for future projects, 10 Percent Cabinetry offers an extensive gallery of ready to assemble cabinets designed to inspire your next transformation. Browse through completed projects, explore different door styles and finish options, and discover how other homeowners have used RTA cabinets to achieve their renovation dreams without draining their savings accounts.
The confidence and skills you’ve developed through this project transfer beautifully to other home improvement endeavors, opening doors to transformations you might have previously considered beyond your capabilities. With your newly transformed kitchen standing as proof of what’s possible, it’s time to consider where your next upgrade journey might lead.
Transform Your Kitchen with Confidence Using Grey Shaker Glass-Door Cabinets
Upgrading your upper cabinets with grey shaker RTA glass-door units is one of the most impactful kitchen transformations you can achieve without a complete renovation. This step-by-step tutorial has walked you through every stage—from accurate measurements and careful removal of existing cabinets to professional installation techniques and stunning glass door integration. The timeless appeal of grey shaker cabinets combined with the elegant transparency of glass doors creates a sophisticated aesthetic that opens up your space whilst showcasing your favourite dishware and décor. With ready to assemble cabinets, you gain professional-quality results at a fraction of traditional costs, all whilst enjoying the satisfaction of a DIY kitchen cabinet makeover that adds genuine value to your home. Ready to start your kitchen transformation? 10 Percent Cabinetry offers premium grey shaker RTA cabinets with glass door options designed for straightforward installation and lasting beauty. Our ready to assemble cabinets arrive with detailed instructions, quality hardware, and expert support to guide you through your project. Whether you’re updating a single wall of upper cabinets or planning a complete kitchen cabinet makeover, our collection provides the perfect blend of style, durability, and affordability. Visit 10 Percent Cabinetry today to explore our full range of grey shaker cabinets, request free samples, and discover how easy it is to achieve the designer kitchen you’ve always wanted—without the designer price tag.