RTA Cabinet Assembly Mistakes Trade Teams Should Avoid: Trade teams can prevent common RTA cabinet assembly mistakes by staging boxes, organizing hardware, checking squareness, and resolving layout questions early.
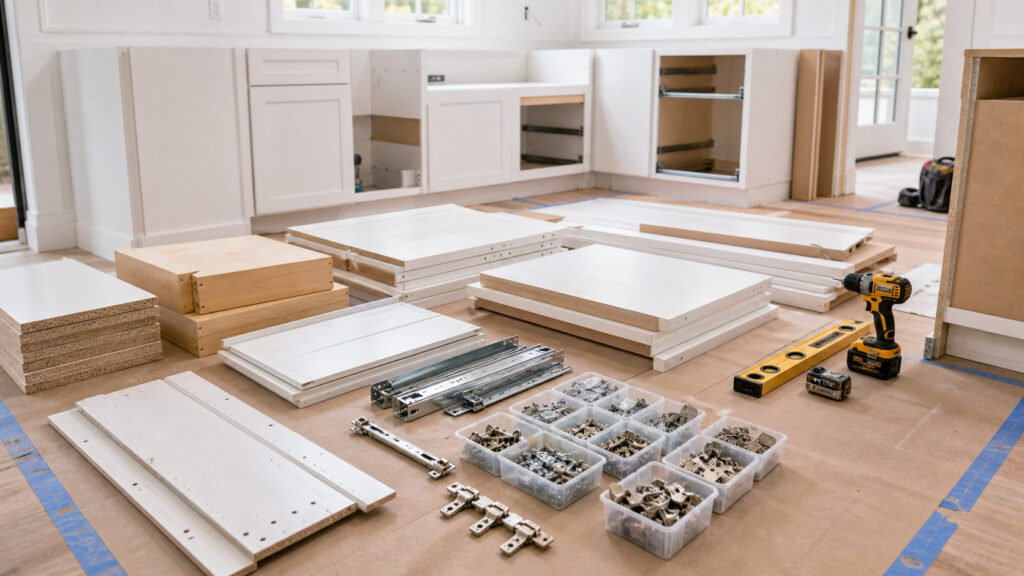
The installer opens the first cabinet box at 7:15 a.m., the customer is expecting visible progress by lunch, and the hardware bags have already been moved twice since delivery.
Assembly problems usually look like installation problems because that is when everyone sees them. In reality, many of them begin earlier, when parts are moved, hardware is mixed, or layout questions are left for the person holding the drill.
The first hour on site sets the tone for the whole cabinet installation. If boxes are opened without a staging plan, the crew can lose track of parts before the first cabinet is square.
A rushed start also creates communication gaps. One installer assumes the hardware is complete, another moves panels to make space, and the lead discovers a layout question only after assembly begins.
The goal is a controlled start: counted boxes, grouped hardware, reviewed drawings, and a clear first wall or first cabinet sequence.
RTA Cabinet Assembly Mistakes: A Trade Buyer’s Pre-Install Review
RTA Cabinet Assembly Mistake Pattern 1: Opening Boxes Without a Staging Plan
Opening every box at once can make the job feel productive while quietly creating confusion. Parts from different cabinets may look similar, especially when several white or natural components are stacked together.
Stage by room, wall, or sequence. The best method depends on the project, but the worst method is letting parts migrate without a label or owner.
The assembly resources should be reviewed before the crew decides its staging approach.
The first hour of staging controls the rest of the installation day more than most crews admit.
RTA Cabinet Assembly Mistake Pattern 2: Treating Hardware as Interchangeable
Hinges, drawer slides, screws, brackets, and specialty hardware should be separated before the crew moves quickly. Similar parts are not always interchangeable.
Use trays or small bins, and keep hardware with the cabinet group it supports until the installer confirms the sequence. A few minutes of organization can prevent hours of adjustment.
A dealer support team can also help by reminding buyers that hardware staging is part of install readiness, not a cleanup detail.
RTA Cabinet Assembly Mistake Pattern 3: Skipping Squareness Until the Cabinets Are Set
A cabinet that is slightly out of square may not look wrong while it is on the floor. The problem becomes visible when doors, drawers, reveals, and adjacent cabinets expose the error.
Squareness should be checked during assembly, before fastening cabinets into a run. Waiting until the run is connected limits the installer’s options.
The specification book can support dimensional checks when the team needs to verify cabinet expectations.
Hardware organization is a production issue, not a housekeeping preference.
RTA Cabinet Assembly Mistake Pattern 4: Letting Layout Questions Reach the Installer Too Late
The installer should not be the first person to discover that an appliance opening, filler location, or panel condition is unclear. Those questions belong in the planning stage.
Late layout questions force field decisions. Some field decisions are harmless, but others change the finished look in ways the customer did not approve.
If a layout detail is uncertain before installation, use the contact page to clarify the product or support question before the crew starts.
Crew Habits That Reduce RTA Cabinet Callbacks
Good crews make their checks visible. They count parts, group hardware, confirm cabinet orientation, check squareness, and review the next step before moving to speed.
They also avoid blaming the product before checking the process. Many assembly frustrations come from sequence errors, mixed parts, or assumptions about finished sides.
Training should focus on repeatable habits. A crew that follows the same start-up routine on every RTA project reduces the chance of one person improvising under pressure.
Squareness checks are easiest when the cabinet is still adjustable and most painful after the run is already fastened.
A Pre-Install Review Sheet for Trade Teams
A review sheet should be short enough to use on a real job. Include delivery count, visible damage check, layout version, hardware staging, first cabinet sequence, squareness owner, and unresolved questions.
The sheet is not paperwork for its own sake. It gives the contractor, dealer, and installer a shared checkpoint before expensive time is spent.
For projects still in the ordering stage, the product lineup and catalogue resources help the team understand what will arrive before the crew prepares the space.
Use this table to turn the decision into checks your team can assign before the project depends on memory.
| Trigger | Likely consequence | Prevention step | Owner |
|---|---|---|---|
| Boxes opened randomly | Parts mixed between cabinets | Stage by room, wall, or cabinet sequence | Lead installer |
| Hardware left loose | Wrong hinge or slide used | Sort hardware in trays before assembly | Installer assistant |
| Squareness checked late | Door and drawer reveals are misaligned. | Check each box before connecting runs | Lead installer |
| Layout question unresolved | Field decision changes finished look | Clarify before installation day | Project manager |
This second table narrows the decision further by matching common trade situations with practical next moves.
| Task | Sign-off cue | Why it matters |
|---|---|---|
| Count boxes | Cartons match order list | Shortages are caught before assembly |
| Inspect visible damage | Photos and notes taken immediately | Replacement questions start early |
| Group hardware | Trays match cabinet groups | Assembly sequence stays controlled |
| Assign squareness check | One person owns verification | Reveals and alignment are protected |
The Dealer Support Role Before Install Day
Dealers can reduce assembly mistakes before the installer ever opens a box. The support role starts with clear product resources, accurate cabinet lists, and reminders about hardware staging and inspection.
A dealer does not need to manage the jobsite, but the dealer can help the contractor understand which details deserve attention. If a line has specific assembly steps or common questions, those should be discussed before the crew starts.
This support protects the dealer relationship. Contractors remember whether a supplier helped them prepare or left them to discover every detail under pressure.
How Assembly Discipline Reduces the Punch List
Many cabinet punch-list items begin as small assembly choices. A box that is not square, a drawer slide installed carelessly, or a door reveal ignored early can become a visible customer complaint later.
Assembly discipline means checking the hidden work before the finished room depends on it. The crew should verify cabinet boxes, hardware placement, alignment, and fastening decisions while corrections are still easy.
A shorter punch list improves more than the schedule. It protects customer confidence because the finished cabinetry looks intentional instead of corrected.
Training New Crew Members on RTA Cabinet Work
New crew members should not learn RTA cabinet assembly only by watching someone rush through the first cabinet. They need a simple training path: identify parts, group hardware, read the sequence, check squareness, and understand when to stop for clarification.
The lead installer should assign tasks that match experience. A newer installer can stage parts and organize hardware while a more experienced person verifies cabinet alignment. As confidence grows, the newer installer can take on more assembly responsibility.
Training works best when it is repeatable. The same start-up routine on every project makes it easier for new crew members to build good habits rather than copying whatever happened on the last rushed job.
Managing Customer Visibility During Assembly
Customers often see the cabinet project during its messiest stage. Boxes are open, parts are on the floor, and the room may look less complete than expected. A controlled assembly area helps the contractor maintain confidence.
Explain what the customer is seeing if they visit during assembly. Organized hardware, protected floors, and staged cabinet parts show that the crew is working through a process, not improvising.
The visual discipline matters. A tidy staging area will not fix a wrong cabinet, but it makes the project feel managed while the team checks the details that lead to a clean finish.
Why Cabinet Inspection Photographs Matter
Photographs are not just for documenting damage. They help the contractor remember how the shipment arrived, which cartons were opened first, and whether a visible issue existed before assembly began. Clear photos can make support conversations faster and less emotional.
The crew should photograph carton labels, visible damage, unusual packaging conditions, and the staged hardware setup. The photos do not need to be artistic. They need to be clear enough for a project manager, dealer, or supplier support contact to understand the situation later.
Inspection photographs also protect the customer relationship. If a question arises, the contractor can show that the shipment was checked and that the team followed a process. That is better than relying on memory after the room is already disrupted.
Sequence Planning for Base, Wall, and Tall Cabinets
Assembly sequence matters because not all cabinets create the same installation pressure. Base cabinets often control countertop timing, wall cabinets affect alignment and visual balance, and tall cabinets can expose ceiling or clearance issues quickly. The crew should decide the sequence before the parts are scattered.
A common approach is to identify the cabinets that control the layout first. That may be a sink base, a corner condition, an appliance opening, or a tall pantry cabinet. Once those anchors are clear, the rest of the run can be staged more confidently.
Sequence planning also helps with hardware and panel organization. Parts that are needed later should not be in the middle of the work zone, and parts needed first should not be buried under unopened cartons. The room should support the workflow instead of fighting it.
The Callback Review After Completion
After the job is complete, the contractor should review any callbacks or adjustments with the crew. Was the issue caused by assembly sequence, hardware placement, cabinet squareness, missing information, shipment condition, or customer change? The answer determines what should improve next time.
A callback review should avoid vague blame. Saying that the job was difficult does not teach the next crew anything. Saying that the hardware was not sorted before assembly or that the filler location was unclear gives the team a specific process to fix.
The review closes the loop. RTA cabinet assembly becomes more reliable when each finished project improves staging, training, inspection, and communication on the next one.
Tool Readiness Before the First Cabinet
Tool readiness is part of assembly quality. The crew should not discover after opening boxes that the right drill bits, clamps, level, shims, protective pads, or work surface is missing. A missing tool slows the day and encourages shortcuts.
The lead installer should set a tool check before cabinet parts are spread across the floor. This keeps the workspace organized and prevents the crew from moving hardware or panels repeatedly while searching for equipment. A calm setup protects both the cabinets and the schedule.
Tool readiness also helps newer crew members. When the correct tools are visible and assigned, the crew can focus on the sequence instead of improvising. That reduces small mistakes that later show up as alignment problems.
The Dealer Feedback Loop After an Assembly Issue
When an assembly issue occurs, the dealer should capture the lesson without turning the conversation into blame. Was the problem caused by unclear product information, a missing customer decision, mixed hardware, rough handling, or a crew sequence error? Each cause points to a different improvement.
If the issue came from unclear documentation, the dealer can improve the handoff. If it came from crew habits, the contractor can adjust training. If it came from a damaged part, the support process needs clear information and timely photos.
This feedback loop makes future projects stronger. The dealer becomes more useful to contractors, and contractors become more confident using the same cabinet line again.
Protecting Finished Surfaces During Assembly
Finished cabinet surfaces should be protected from the beginning, not after the first scratch appears. Use clean padding, keep hardware away from door faces, and avoid stacking finished panels where grit or screws can mark them.
The crew should separate cutting, drilling, and hardware sorting from finished door staging whenever space allows. A small scratch can feel minor during assembly but become the customer’s first complaint after cleanup.
Surface protection is a habit. Crews that protect parts automatically usually produce cleaner installs and fewer end-of-project conversations about avoidable damage.
The Hardware Count Before Anything Is Fastened
Before cabinets are fastened together or set into position, the crew should make a hardware count for the pieces that will be used first. This is different from a full inventory of every small part. It is a practical check that the immediate sequence can proceed without stopping halfway through a cabinet.
The count should include hinges, screws, brackets, slides, clips, and any specialty hardware tied to the first run. If something appears short, the lead installer can pause while the room is still organized. Discovering a shortage after parts are attached and boxes are scattered makes every correction slower.
This step also keeps the crew from borrowing hardware from a later cabinet without recording it. Borrowing may solve one problem and create another problem near the end of the day. A visible count protects the whole sequence.
The Final Room Walkthrough Before Doors and Drawers Are Adjusted
Before the crew spends time on final door and drawer adjustments, the lead installer should walk the room and confirm that each cabinet is in the intended position, that finished sides face the right direction, and that no hardware group has been borrowed from a later cabinet without being replaced. This walkthrough catches process mistakes before finishing work and hides them.
The walkthrough should include the project manager when possible. A second set of eyes can compare the installed run against the approved layout, note any customer-visible concern, and decide whether a correction is needed before the room is presented as nearly complete. That timing is important because customers notice confidence as much as they notice craftsmanship.
FAQ: RTA cabinet assembly mistakes
What is the most common RTA cabinet assembly mistake on contractor jobs?
The most common mistake is starting without a staging plan. When boxes, panels, and hardware are opened or moved randomly, small confusion can affect the whole installation.
How should hardware be organized before cabinet assembly starts?
Separate hinges, slides, screws, brackets, and specialty hardware into trays or groups that match the cabinet sequence. Keep the hardware close to the cabinets it supports.
When should installers check cabinet squareness?
Check squareness during assembly and again before cabinets are joined into a run. Waiting until the run is set makes corrections harder.
What layout questions should be resolved before the install crew arrives?
Resolve appliance openings, filler locations, finished panel needs, island details, tall cabinet placement, and any condition that changes visible cabinet alignment.
How can dealers help contractors reduce cabinet assembly callbacks?
Dealers can provide clear product resources, remind buyers to stage hardware, support specification checks, and encourage contractors to clarify uncertain details before installation.
If an installation date is approaching, review assembly resources and clarify unresolved cabinet questions before the crew is forced to solve them on the floor.
Read more:
Elevate Your Kitchen with Modern Shaker Cabinets
Maximize Your Home’s Value with RTA Kitchen Cabinets
6 Reasons Why 10 Percent Cabinetry is Your Ideal Choice
While RTA cabinets are known for their affordability, quality is never compromised. At 10% Cabinetry, we use only the finest materials, including hardwood and plywood, to ensure durability and longevity. With our commitment to excellence, you can trust that your ready-to-assemble (RTA) cabinets from 10% Cabinetry will withstand the test of time.
At 10% Cabinetry, we pride ourselves on providing premium ready-to-assemble (RTA) cabinets, which provide the perfect combination of high-quality craftsmanship and affordability. Our ready-to-assemble (RTA) cabinets come in a wide range of styles, finishes, and configurations, offering homeowners to personalize their space to their exact specifications. Whether you prefer classic elegance or modern flair, 10% Cabinetry is the perfect solution for you.
The days of hard and complex installation procedures are long gone. Because ready-to-assemble (RTA) cabinets are made to be easily assembled, homeowners may confidently take on the installation procedure. With ready-to-assemble (RTA) cabinets from 10% Cabinetry, our team of professionals is available to help with installation, guaranteeing a smooth process from beginning to end.